Configure TDS as a Central Server
Tessonics Corporation has made every effort to ensure the accuracy and completeness of this document; however, because ongoing efforts are made to continually improve the capabilities of our products, we cannot guarantee the accuracy of the contents of this document. We disclaim liability for errors, omissions, or future changes herein.
Tessonics Corporation and its subsidiaries reserve the right to make changes, corrections, enhancements, modifications and improvements to its products and/or to this document at any time without notice.
Information in this document supersedes and replaces information previously supplied in any prior versions of this document.
Tessonics and the Tessonics logo are trademarks of Tessonics Corporation.
All other trademarks mentioned herein are the property of their respective owners.
©2007–2024 Tessonics Corporation. All rights reserved.
No part of this document may be copied, reproduced, or translated, without the prior written consent of Tessonics Corporation.
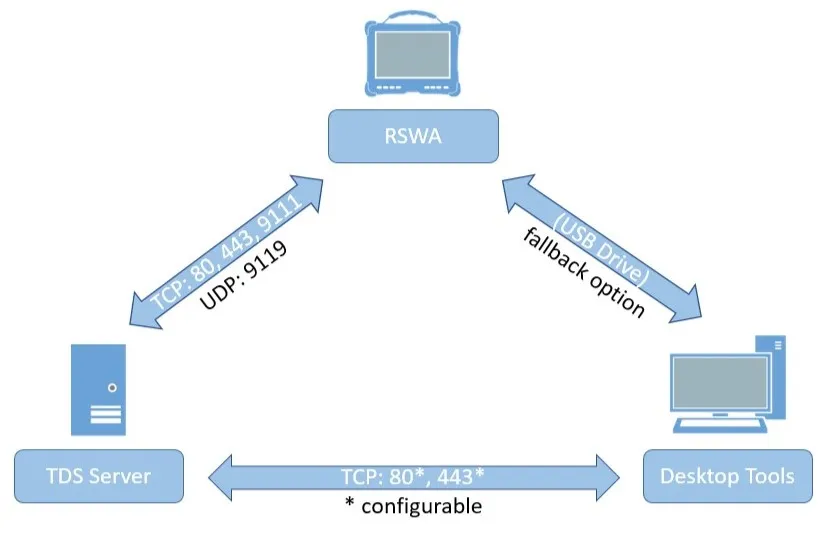
It is common to have a central server with all relevant inspections, parts, groups and users, shared across all computers and RSWA units. This document provides a step-by-step guide on how to configure this for any work environment.
 {min-width=50%}
Configuring the PCs and the Central Server
After deciding on one central computer to use as the global server, be sure to install Desktop Tools and TDS on that computer.
Then, go through the following steps on that computer to configure the server.
Note
Some of these steps will require Administrator privileges to accomplish.Find the Computer’s IP Address
Warning
It may be more beneficial to consult your IT department about this step, but below are some general guidelines.Open up Command Prompt by selecting the Windows Start button, going to the search bar, then type cmd.
Once Command Prompt is opened, type ipconfig. You might see something like this:
Windows IP Configuration


Ethernet adapter Ethernet:

   Connection-specific DNS Suffix  . :
   Link-local IPv6 Address . . . . . : some::address::abcd::efgh::ijkl%12
   IPv4 Address. . . . . . . . . . . : 192.168.12.345 // This address
   Subnet Mask . . . . . . . . . . . : 255.255.255.0
   Default Gateway . . . . . . . . . : 192.168.67.890

... more sections
Under the first section, the address named IPv4 Address starting with 192.168 should be the correct IP address.
Update the URL in TDS
Open the configuration file tds-server.json inside the directory C:\ProgramData\tessonics\tds2 and update the "url"
field to include the IP address from the previous step (i.e. “https://192.168.12.345”).
Caution
The file is inside ProgramData, not “Program Files” or “Program Files (x86)”. The ProgramData folder is by default hidden in Windows and requires Administrator privileges to access.Run TDS as a Service
You can visit here to run TDS as a Windows Service for the first time.
To summarize, it involves opening Command Prompt, navigating to the installation folder of TDS (C:\Program Files\Tessonics\TDS2) and running the
command ./tds-server.exe service-install.
If you already followed this step, open up Services by selecting the Windows Start button, going to the search bar, then type services.
Once Services is open, scroll to find the service Tessonics Data Server, right click it and select Start.
Caution
If the service is already running, stop it and rerun it again to apply the changes made in the previous step.Update Desktop Tools
On all computers with Desktop Tools installed, go to File, Data Source, Configure Data Source and replace the IP address in the URL with the IP of the computer server (found above).
Now, whenever you want to access TDS on one of these computers, type that same URL in a browser. You may get a privacy warning, which can be disregarded.
Update the RSWA Units
Consult this section to transfer the data from Desktop Tools to the RSWA units (either the F1 or F2 units). Once that is completed, the RSWA units will connect to the server.
