Managing Users
Tessonics Corporation has made every effort to ensure the accuracy and completeness of this document; however, because ongoing efforts are made to continually improve the capabilities of our products, we cannot guarantee the accuracy of the contents of this document. We disclaim liability for errors, omissions, or future changes herein.
Tessonics Corporation and its subsidiaries reserve the right to make changes, corrections, enhancements, modifications and improvements to its products and/or to this document at any time without notice.
Information in this document supersedes and replaces information previously supplied in any prior versions of this document.
Tessonics and the Tessonics logo are trademarks of Tessonics Corporation.
All other trademarks mentioned herein are the property of their respective owners.
©2007–2024 Tessonics Corporation. All rights reserved.
No part of this document may be copied, reproduced, or translated, without the prior written consent of Tessonics Corporation.
Note
This section describes old version of the User Manager. Tessonics recommends using newer version of the designer software for managing RSWA users.This chapter describes the User Manager – an application developed for managing users. The user information created by the User Manager is then used by other Tessonics applications.
User management provides the following benefits:
- Associate RSWA measurements with operators
- Control available options in user interfaces
- Enables the RSWA to manage Inspections for each user
- Control access to system settings and applications
Basic Concepts
- User
- Identifies the person who is using an application or RSWA so that access to functionality and data can be controlled.
- Shared Users
- Users that exist on many RSWA units and Desktop PCs with the same settings and permissions. This is meant to be used when a team of inspectors share many RSWA units. Additionally, data that is stored on individual units by shared users can easily be collected, merged, and redistributed.
- Local Users
- Users that only exist on one single RSWA. This is useful for individuals who only use one particular RSWA unit. This mode is only recommended for single RSWA units that do not use any Part Inspection types or Reporting. Local users on an RSWA are not known on a Desktop PC, and their names will not show properly.
- Admin User
- The user on every RSWA unit that has access to all applications, settings and data. This user is password protected and cannot be deleted or edited in any way. This user is only meant to be used for administration purposes.
- Permissions
- Used to limit and control users access to restricted functionality and data. There are no limitations as to how permissions are granted but users should be trained to use the restricted features and data before they are granted permission. Because permissions directly affect the execution of the applications we develop, the list of permissions that can be granted is maintained by Tessonics.
- Passwords
- All users have the option of password protecting their account but are not required to do so. Passwords are case-insensitive (i.e. PAssWOrd = password) and allow for any combination of characters (including spaces). In the event that a user forgets their password, it can be reset by the user management software.
Logging In
To start the user manager:
- From Launcher: switch to the Utilities tab, then click the User Manager button
- From Windows Desktop: Start → Programs → Tessonics and click the User Manager shortcut
If you are not logged in, the User Manager will ask you to log in. Only users with permission to run the User Manager will be shown. See the RSWA Users Manual for details on how to log in.
On an RSWA unit, the User Manager only works with Local users. On a desktop PC, the User Manager only works with shared users.
The user manager will display the group of users it is currently working with in the title bar; see the images below.
 {min-width=50%}
 {min-width=50%}
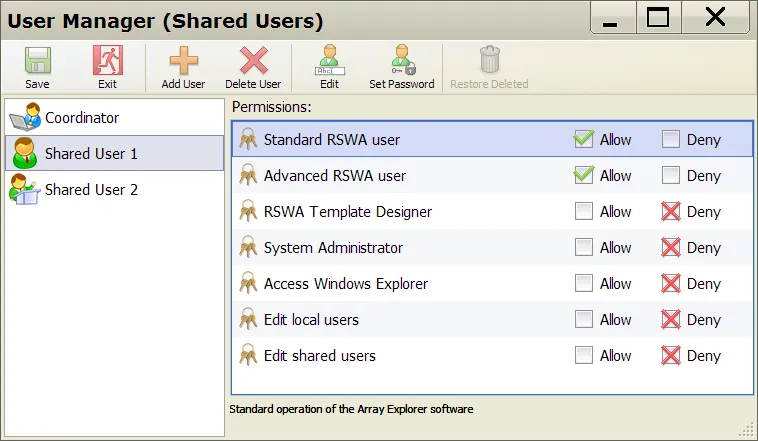
Main Window
The main User Manager window looks like the following:
 {min-width=50%}
The list on the left shows all the users on the RSWA and the list on the right shows the currently selected user’s permissions. Permissions for the selected user can be granted or revoked simply by clicking the Allow or Deny check boxes.
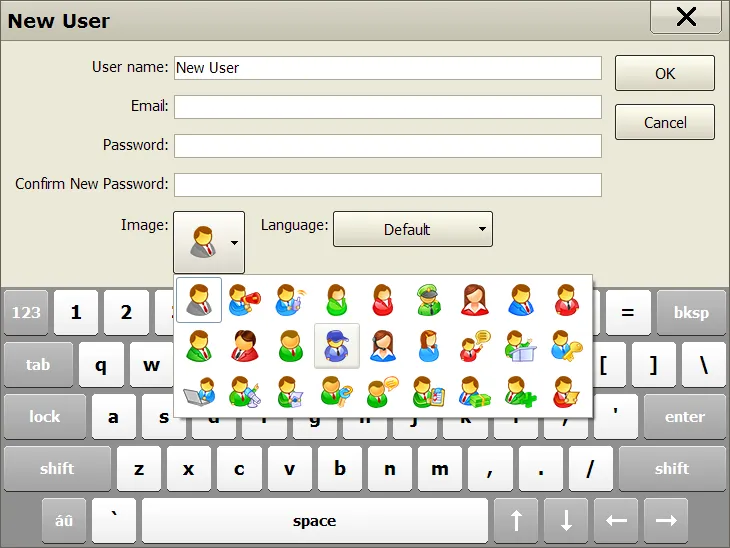
Adding Users
Clicking the Add User button brings up the New User dialog window shown below. Enter the new user’s name and choose an image for the user from the list. Optionally, type in a password for the user, enter an email address, and choose a language preference for this user.
 {min-width=45%}
Deletinig Users
Clicking the Delete User button deletes the selected user, placing all of their information into the trashcan. This deleted user is now unusable, and will not appear in the log in prompts.
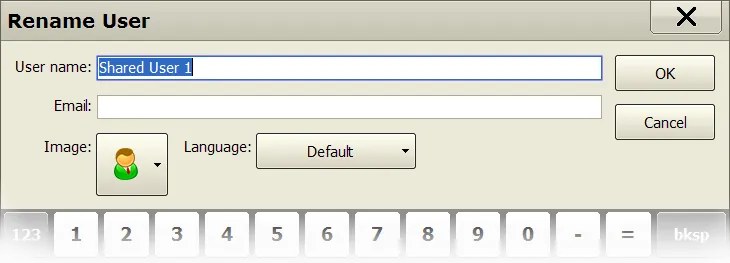
Editing Users
Clicking the Edit button will display the prompt shown in the following image:
 {min-width=50%}
This prompt is used to change the name, image, email address, or language associated with the currently selected user.
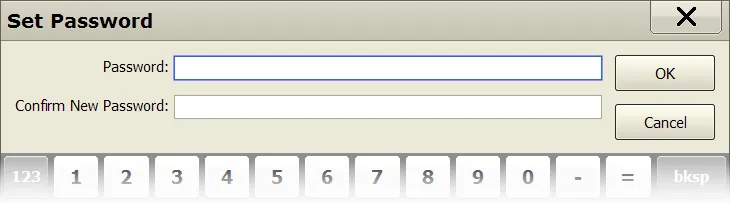
Setting Password
Clicking the Set Password button will display the Set Password prompt shown below:
 {min-width=50%}
Enter in the new password twice to avoid typing errors, and press OK to save the changes.
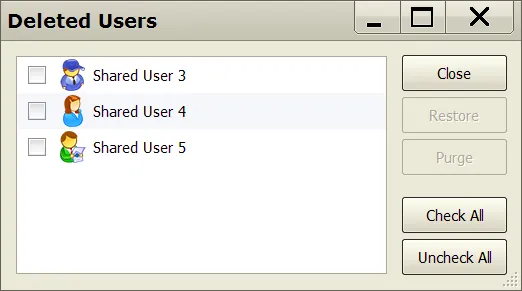
Restoring Deleted Users
Click the Restore Deleted button will display the Deleted Users prompt shown below:
 {min-width=50%}
Select users by clicking on the checkbox next to their name, or by clicking the Check All/Uncheck All buttons in the lower right hand corner. Clicking Restore will undelete and restore those users to their original state. Clicking Purge will permanently delete the selected users.
Saving Changes
Clicking the Save button saves the changes you have made. This option is disabled if there haven’t been any changes.
Managing Shared Users
The goal of shared users is to have consistent user names, passwords, and permissions in an environment where several operators have access to multiple RSWA units.
Similar to the RSWA Template Designer application, the RSWA Synchronizer takes care of ensuring each RSWA unit is up to date with the latest users. Managing shared users is done in the following manner:
- Install the RSWA software onto a desktop PC (see Chapter Installing and Updating RSWA Software). Make sure the User Manager option is checked when you install the RSWA software.
- Start the User Manager application, log in as Admin or as a user with shared user editing permissions.
- Add, remove, or modify existing users as described earlier in this chapter.
- Synchronize every RSWA unit using the Synchronizer application and a USB stick. Each RSWA will now have the updated Shared Users database.
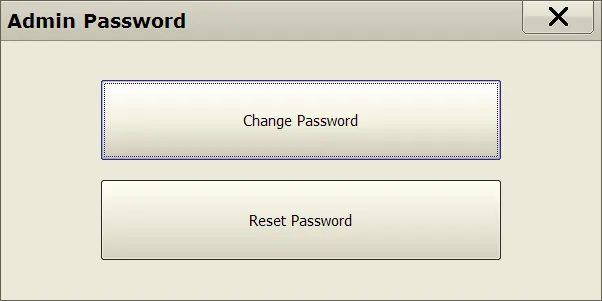
Changing the Admin Password
The Admin user is in many ways different from other users. This account is not managed by the User Manager. It is also not shared; each RSWA or PC can have a different Admin password. We recommend picking a short, but hard to guess password for the admin user and assign that same password to each PC or RSWA. To change the password for Admin, start the Admin Password utility:
- From Launcher – switch to Utilities tab, then click the Admin. Password button (
 ).
). - From Windows Explorer – go to Start→Programs→Tessonics and click the Admin Password shortcut ().
 {min-width=50%}
In the Admin Password window, choose Change Password or Reset Password.
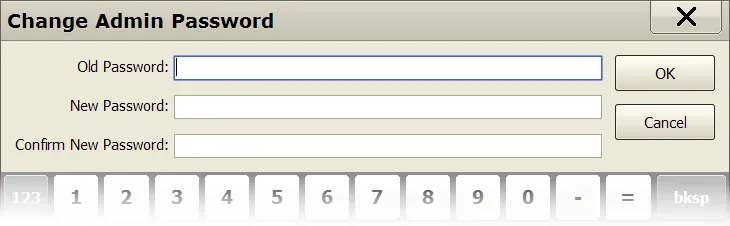
- Change Password option
- Allows you to change the Admin password if the existing Admin password is known. You will be prompted to enter the old password and the new password (see the image below). Hit OK to save the change.
 {min-width=50%}
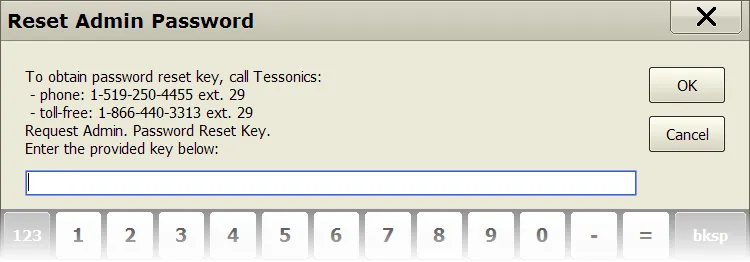
- Reset Password option
- Allows you to set the Admin password when the current Admin password is not known. To reset the password, call Tessonics, and we will provide you with a special password reset key which you will need to enter at the password reset prompt (see the image below). Hit OK, enter the new password, and then hit OK again to complete the operation.
 {min-width=50%}
